There are treks that you do for the views, and then there are treks that leave you speechless. The Nanga Parbat Base Camp Rupal Face trek is one of those. If you’ve ever looked at a photo of the Rupal Face and thought, I need to see that in real life, same.
I finally made it there, and let me tell you—it didn’t disappoint. Standing at the first base camp, staring up at the world’s largest rock wall, I felt tiny, overwhelmed, and ridiculously glad I made the trek. I might’ve even cried. (Don’t judge.)
If you’re thinking about doing this trek, here’s everything you need to know: how to get there, what to pack, where to camp, and what to expect on the trail —just everything I wish I knew before going.
About Nanga Parbat
Nanga Parbat isn’t just one peak—it’s a 20-kilometer-wide fortress of ice and rock, with ridges so sharp they look like something out of a fantasy novel. Standing at 8,126 meters, it’s Pakistan’s second-highest mountain after K2 and has a reputation for being deadly—24 out of every 100 climbers who attempt to summit don’t make it back.
The Nanga Parbat Base Camp Rupal Face trek, though? Way more doable. Instead of climbing, you get to trek through some of the most dramatic alpine scenery in Pakistan, with glaciers, high-altitude meadows, and towering cliffs all around you. Unlike the crowded Fairy Meadows side, the Rupal Face trek is quieter, tougher, and way more rewarding.
Besides the base camp, you can also see Nanga Parbat from the Deosai Plains and Khun Meadows in Khaltaro Valley – easier options if you’re not a hard core trekker.
What is the Rupal Face of Nanga Parbat?
If you’ve only heard of Fairy Meadows, you’re missing half the story. Nanga Parbat has three major faces, each leading to a different base camp:
- Rakhiot Face (North) – The easiest to access, leading to Fairy Meadows, the most tourist-friendly route.
- Diamir Face (West) – The base for the Kinshofer route, which most summit climbers take.
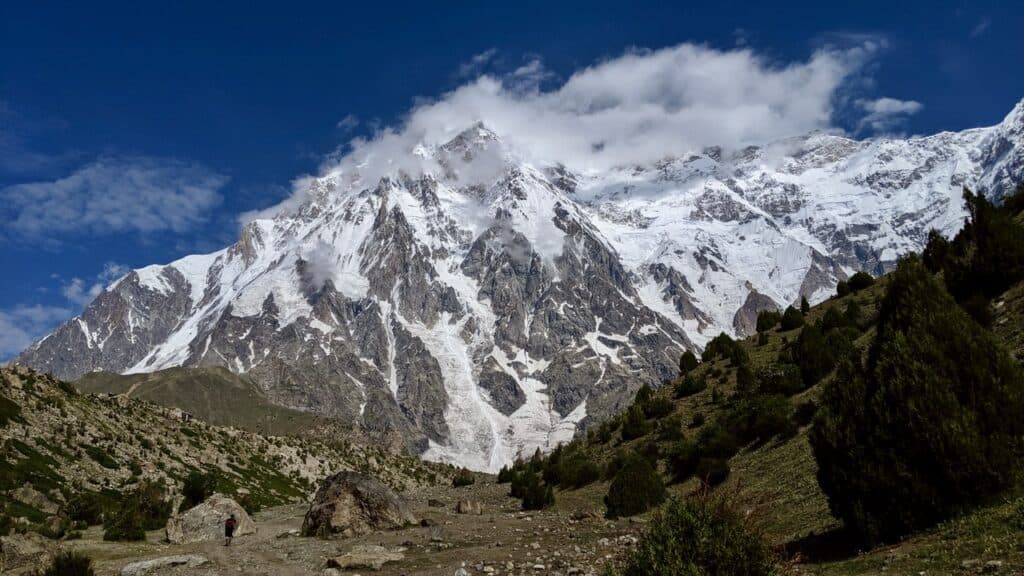
- Rupal Face (South) – The real beast. Steep, wild, and home to the largest rock wall in the world.
The Rupal Face is what makes this trek so special. It’s a 15-kilometer-long vertical rock wall, rising 4,600 meters from base to summit—which is higher than some entire mountains. Seeing it in person is mind-blowing.
The Nanga Parbat Base Camp Rupal Face trek takes you through 30 kilometers of rugged terrain, cutting through glaciers, high-altitude meadows, and deep gorges. It’s a tough but doable trek, especially if you have basic hiking experience. Unlike Fairy Meadows, which is packed with tourists, this route is quieter, more remote, and way more rewarding.
If you want a real adventure, this is where you’ll find it.
How to Get There
To get to the starting point of the trek, you need to reach Tarashing, the last village before the trail begins.
Option 1: By Air
- Fly into Islamabad, then take a domestic flight to Skardu (1-hour flight).
- Warning: Skardu flights are notorious for last-minute cancellations due to weather. If you get lucky, though, the views from the plane are ridiculous—you might even spot Nanga Parbat from the air.
- Once in Skardu, you’ll still need to drive 6-7 hours to Astore before heading to Tarashing. If you have time, Skardu is worth exploring before moving on (check out this guide on what to do nearby).
Option 2: By Road
- Islamabad to Astore – 15 hours of potholes, sheer drop-offs, and the occasional goat traffic jam. If you love punishingly long road trips, congratulations—this one’s for you.
Astore to Tarashing – Another 2-hour off-road ride by jeep, rough but insanely scenic. By the time you get there, you’ll have earned that first step on the trail.
Trek Details
| Trek Distance | 26 kilometers |
|---|---|
| Duration | 4 days (can be done in 3 days with prior experience) |
| Max Elevation | 3,550 meters |
| Min Elevation | 2,911 meters |
| Guide | Highly recommended for safety and navigation |
| Accommodation | Tent camping throughout the trek |
| WiFi/Signal Availability | Limited or nonexistent along the trek |
Nanga Parbat Rupal Face Basecamp Step-By-Step Trail Guide
H3 Day 1: Astore to Tarashing
Whether you fly to Skardu or take the long drive up north, the journey starts with renting a jeep from Astore to Tarashing—a small village that marks the beginning of your trek. The 31-kilometer drive takes around two hours. Once you reach Tarashing, you can take the rest of the day to settle in and acclimatize. It’s a quiet spot, with the towering mountains reminding you of the adventure ahead.
Day 2: Tarashing to Herligkoffer – 10 km, ⬆ 639 m
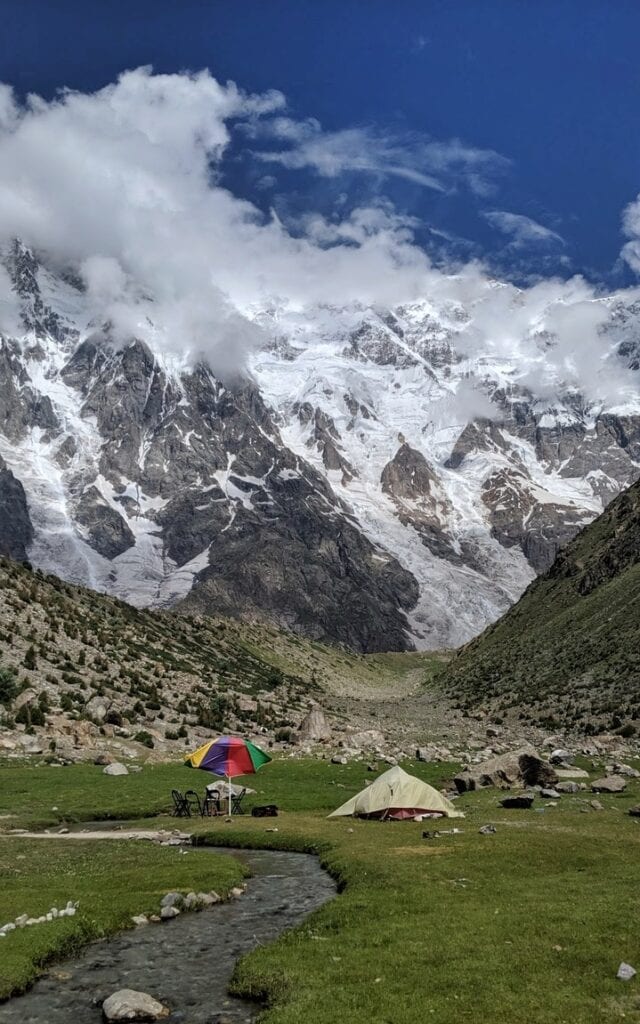
Day two is where the real trekking begins. Starting from Tarashing, you’ll follow the trail along the Tarashing Glacier. It’s a gradual climb through the Rupal Valley, and although the ascent is steady, it won’t wear you out. After trekking for about 5-6 hours, you’ll arrive at camp 2, Herligkoffer Base Camp, which sits at 3,550 meters. This campsite is named after Karl Herligkoffer, a German mountaineer famous for his Nanga Parbat expeditions. The views here make you realize just how close you’re getting to the heart of this giant mountain.
Day 3: Herligkoffer to Latobah – 3 km, ⬇ 20 m
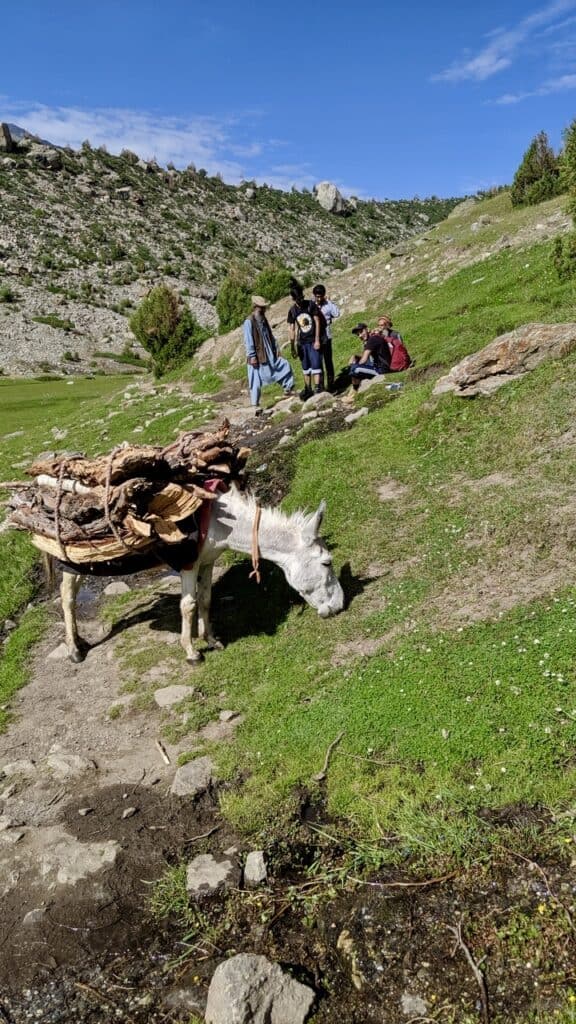
The trek from Herligkoffer to Latobah on day three is a shorter one, but don’t let the distance fool you—it still requires some focus. You’ll be crossing the Bazhin Glacier, where the trail becomes rockier and more challenging. After about 3-4 hours, you’ll reach camp 3 at Latobah, a meadow where local herders often bring their livestock. It’s a peaceful spot, and you can feel the imposing presence of Nanga Parbat looming above.
Day 4: Latobah to Tarashing
The final day brings you back down the same path to Tarashing. Although descending is easier on the legs, you’ll still want to take it slow and steady. By the time you make it back to Tarashing, you’ll likely be exhausted but also filled with a sense of accomplishment from completing one of the most memorable treks of your life.
Option to Extend Your Trip!
If you’re not quite ready to leave the mountains just yet, there are a couple of ways to extend your trek:
- Day 6: Latobah to Shigiari – A two-hour trek from Latobah leads you to Shigiari, where you can camp right at the foot of Nanga Parbat.
- Day 7: Latobah to Mazeno Base Camp – For those looking for more of a challenge, you can continue trekking to Mazeno Base Camp, adding more time to explore the less-visited side of the mountain.
Afterward, you can head back to Latobah and then return to Tarashing to complete your journey.
If you’ve got extra time, you can explore Minimarg or Deosai Plains before heading back. This trek was part of a larger itinerary—check out my full journey through Northern Pakistan.

Hiring a Guide
Pakistan isn’t exactly known for well-marked trekking routes, and the Nanga Parbat Base Camp Rupal Face trek is no exception. If you’re used to clearly defined trails and signposts, prepare for a reality check—there aren’t any. The terrain shifts, glaciers move, and paths that were fine last year might be impassable now. Unless you’re confident navigating rocky crossings, river fords, and unpredictable weather, hiring a local guide is a smart move.
A good guide keeps you on track, helps with acclimatization, and knows where to find water sources and safe camping spots. They also know seasonal trail changes, which is critical since what looks like a path can sometimes lead straight onto unstable glacier debris.
If you’re trekking solo or don’t have prior experience with high-altitude, remote treks, you’ll be better off with a guide. Expect to pay around $25–$50 per day, depending on experience and whether they’re providing meals or carrying gear. The best way to find one is through word of mouth—ask trekkers who’ve done the route before, check with guesthouses in Astore or Tarashing, or, if you want to set something up in advance, reach out—I can put you in touch with someone reliable.
What to Bring on the Hike
Packing the right gear can make or break your experience on any trek, I learned that the hard way. This isn’t just about comfort; it’s about being well-prepared for everything the mountain might throw at you. Here are some essentials to bring along:
Hiking boots – My Lowa hiking boots have been with me since 2013 and are still one of my best investments for long treks.
Warm layers
Waterproof jacket and pants – Essential for sudden weather changes.
Sun hat and sunglasses – The mountain sun is intense, even in cooler weather.
Trekking poles – Useful for steep sections and rocky terrain.
Backpack
Sleeping bag and mat – Nights can be quite cold, so a good-quality sleeping bag is essential.
Water bottles or hydration system – Staying hydrated is key, especially at altitude.
Headlamp with extra batteries – For early starts or late finishes.
Toiletries – Bring toilet paper, wet wipes, and hand sanitizer.
Basic first aid kit – Include any medications you might need, especially for altitude sickness.
Pack smart and only bring what you truly need. Consider using a waterproof bag or cover to protect your belongings in case of unexpected rain or snow. You can carry your own gear, or if you’d prefer to travel lighter, hire a porter to help.
Where To Stay
Since this trek is a full-on camping experience, you’ll need to bring your own tent, sleeping bag, mat, and cooking gear. There are no hotels or lodges on the route—just you, the mountains, and your campsite. If you’re trekking with a tour, they usually handle the camping equipment for you.
For the nights before and after the trek, you have a few options depending on where you’re starting from:
Astore (Closest town to Tarashing) | If you want to stay somewhere close to the trailhead, Astore is your best bet. Guesthouses here are basic but comfortable.
DeJani Hotel and Resorts Astore – I personally haven’t stayed here so I can’t vouch for it.
Skardu (If you’re coming via flight) | If you’re flying into Skardu, you might want to spend a night here before heading to Astore. There’s a mix of budget and high-end stays
Serena Shigar Fort – If you feel like splurging, this restored fort-turned-hotel is stunning
Baltistan Fort Skardu – More budget-friendly, solid option for a short stay
Hunza | If you’ve got extra time, Hunza is 100% worth a visit after your trek. It’s one of the most beautiful valleys in Pakistan and a great place to recover from the hike.
Serena Alti Fort – The best place to wind down after a trek
Old Hunza In. Centrally located in Karimabad, this is a reliable and comfortable option
Alternatives to the Southside Basecamp
If you’re looking for a shorter, easier trek, Fairy Meadows is the most well-known alternative. Located on the northern side of Nanga Parbat, it offers stunning views of the Raikot Face and is far more accessible.
The trek to Fairy Meadows starts with a jeep ride from Raikot Bridge to Tato Village, followed by a 2-3 hour hike. Unlike the Southside Base Camp trek, this route is tourist-friendly, with guesthouses, tea stalls, and a steady stream of visitors—especially during peak season.
That said, if you’re after solitude, a real challenge, and the raw wilderness experience, the Rupal Face trek is the way to go.
(I’ll be covering Fairy Meadows in detail in a future blog post, so stay tuned!)
FAQs
Is the Southside Nanga Parbat Base Camp Trek suitable for beginners?
The Southside Nanga Parbat Base Camp Trek is moderately challenging and best suited for experienced hikers or those with a high level of fitness. The route includes steep climbs, rocky paths, and varying weather conditions, so prior trekking experience is recommended.
Can I go on the Southside Nanga Parbat Base Camp Trek solo?
While solo trekking is possible, it’s strongly recommended to go with a guide or join a trekking group. A guide offers valuable expertise, ensures safety, and enhances the overall experience of the trek.
Are there restroom facilities along the Southside Nanga Parbat Base Camp Trek?
Restroom facilities are minimal along the trek. Since you’ll be camping, most stops have basic, outdoor setups. It’s advised to carry personal supplies like toilet paper, wet wipes, and hand sanitizer.
How can I book a guided trek for the Southside Nanga Parbat Base Camp Trek?
To book a guided trek, research and select a reliable trekking agency that matches your needs and budget. Numerous agencies offer guided treks, and booking in advance is highly recommended.
Related Posts
- A Series of Unfortunate Events: Public Transport Horror Story in Pakistan
- Journey Through Pakistan’s North – Deosai Plains, Minimarg and Nanga Parbat base camp
- Beyond Fairy Meadows: Nanga Parbat Base Camp Rupal Face Guide
- Skiing in Pakistan: A Local’s Guide to Hitting The Slopes
- Motorcycle Diaries
- Where Can Pakistanis Travel Without a Visa?